学习git的笔记,将记录一下git如何使用。之前常用svn,现在转过来的时候,有些东西需要熟悉。将会持续更新此文档。
安装
Linux
Ubuntu
1 | $ apt-get install libcurl4-gnutls-dev libexpat1-dev gettext \ |
Centos/RedHat
1 | $ yum install curl-devel expat-devel gettext-devel \ |
设置自己的用户名
1 | git config --global user.name "Your Name" |
github里面邮箱地址和你设置的地址不匹配,将会存在非常多的问题。
Linux中记住密码的方式:
1 | # 在Linux里面记住密码的文件,这个文件需要创建在本工程目录之下,而不是在系统根目录下。 |
工作流程
概念
| 名称 | 说明 |
|---|---|
| 远程 Git 资源 | 共享git版本的一个库 |
| 工作区 | 本地编辑 |
| 暂存区 | 本地修改了之后,可以将修改提交到本地 |
| 推送 | 将本地的内容推送到远程Git资源服 |
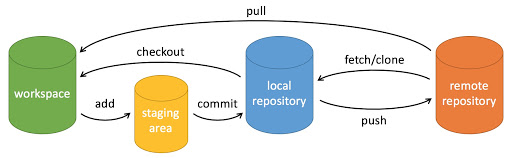
工作区操作
查询状态
1 | git status |
远程操作
分支管理
列出分支
1 | abel@xxxxxx:~/xxxx$ git branch -a |
这个里面将会显示远程分支和本地分支;
将远程的分支切换到本地分支
1 | git checkout -b <本地名称> <远程地址> |
在操作的时候,需要将远程的分支,在本地做一次checkout
在本地切换分支,切换将直接使用checkout
1 | [root@test-qingzhou-01 cx_project]# git checkout master |
删除分支
1 | git branch -d [branchname] |
合并分支
1 | git merge [otherbranch] |
转移文件
这个指令的好处是不会影响文件历史日志,如果直接删除并且增加那就比较麻烦了。
1 | git mv source dst |
切换编辑器
1 | git config --global core.editor vim |
分支合并
之前工作中使用svn来做分支管理。如果在trunk里面修改的bug需要合并到release分支的时候,需要使用merge来操作。
在git里面也有如此的概念,使用的是遴选(cherry pick)。在vscode里面使用git插件就能做这个操作了。有空可以研究一下具体如何通过命令行来出来这个事情。
使用命令行来使用;
1 | PS D:\work\trunk\xxxx> git cherry-pick 7e1e57d |
git rebase 和 git cherry pick 有些类似。
1 | fatal: You have not concluded your cherry-pick (CHERRY_PICK_HEAD exists). |
1 | would clobber existing tag |
本地的tag和远程的tag冲突。
I’m using git in VSCodium and each time I try to pull git is complaining.
Looking into the log I see
1 | > git pull --tags origin master |
查看远程的url地址
git config --get remote.origin.url
git 修改远程的目录
1 | # 查看全部远程地址 |
git转换换行符(回车)
git配置一共分为3个级别,可以通过这个命令来查看。
1 | git config --system --list [优先级最低] |
这个概念类似于环境变量。
其中 core.autocrlf 是决定了文件的回车方式。
- true:提交的时候自动将CRLF转换成LF,签出时自动将LF转换成CRLF;(默认)
- input:提交的时候CRLF转换成LF,签出时不转换;
- false:将回车记录到库中
可以将system的此项修改成input方式,如果使用vscode的时候,将默认的选择行尾序列LF,设置里面Eol里面将默认行尾字符修改成\n。
注解:
CRLF=\r\n carriage return line feed,回车换行,windows常用。
LF=\n;line feed,换行,Linux常用。
1 | git config --global core.autocrlf [true|input|false] |
pull 根据不同的配置,可等于 fetch + merge 或 fetch + rebase。具体了解可继续读下去。
tags冲突
1 | # 查看远程tags |
实例:
1 | PS D:\work\trunk\cx_project> git ls-remote -t |
服务器报错
1 | PS D:\work\trun> git fetch --tags -f |
git撤销掉本地的commit
1 | git reset HEAD~ |
有时候git的提交我们需要回滚已经在本地提交的东西。可以通过执行。
1 | git reset --hard <目标提交的哈希值> |
1 | Reset current branch to this commit |
reset 模式
git reset –-soft:回退到某个版本,只回退了commit的信息,不会恢复到index file一级。如果还要提交,直接commit即可
这个就是将版本强制定到某个版本,然后强制推送。将会把之前的版本都冲掉。最好将分支备份起来。
git reset -–hard:彻底回退到某个版本,本地的源码也会变为上一个版本的内容,撤销的commit中所包含的更改被冲掉
删除分支
1 | $ git branch -d develop_pos |
1 | [2022-09-02T00:22:12.309Z] > git show --textconv :src/user/user.service.ts [1ms] |
git stash
git stash这个命令可以将当前的工作状态保存到git栈,在需要的时候再恢复
1 git stash
保存当前的工作区与暂存区的状态,把当前的工作隐藏起来,等以后需要的时候再恢复,git stash 这个命令可以多次使用,每次使用都会新加一个stash@{num},num是编号
2 git stash pop
默认恢复git栈中最新的一个stash@{num},建议在git栈中只有一条的时候使用,以免混乱
3 git stash list
查看所有被隐藏的文件列表
4 git stash apply
恢复被隐藏的文件,但是git栈中的这个不删除,用法:git stash apply stash@{0},如果我们在git stash apply 的时候工作目录下的文件一部分已经加入了暂存区,部分文件没有,
当我们执行git stash apply之后发现所有的文件都变成了未暂存的,如果想维持原来的样子,即暂存过的依旧是暂存状态,那么可以使用 git stash apply –index
5 git stash drop
删除指定的一个进度,默认删除最新的进度,使用方法如git stash drop stash@{0}
6 git stash clear
删除所有存储的进度
7 git stash show
显示stash的内容具体是什么,使用方法如 git stash show stash@{0}
8 查看帮助
git stash –help
处理嵌套了git的问题
出现这种问题是由于将一个含有git信息的文件夹放入了公司里面的目录。
1 | Failed to collect changes, error: Error collecting changes for VCS repository '"ServerGit" {instance id=49, parent internal id=11, parent id=id_ServerGit, description: "http://git.xxxx.com/xxxxxx/cx_project.git#refs/heads/develop"}' |
使用workflow自动发布版本
实例:
1 | # This workflow will do a clean install of node dependencies, build the source code and run tests across different versions of node |
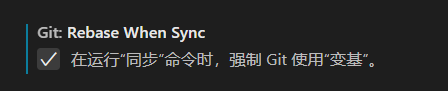
vscode中设置git技巧
开启rebase-when-sync好处在于减少merge方式下的线分裂的很厉害的问题。
可以通过git rebase -i HEAD~6最近6次提交合并成一次提交。
1 | pick:保留该commit(缩写:p) |
开启auto-stash,好处在于当发生conflict的时候将会把我们需要保存的东西自动stash起来。防止中间东西丢失。

1 | # 默认merge方式 |
检出的时候发生问题
Decryption has failed
apt install ca-certificates-mono
https://github.com/duplicati/duplicati/wiki/SSL-TLS-support-in-Mono#generic-debian--ubuntu
https://peaku.co/questions/1513-github:-desconexion-inesperada-al-leer-el-paquete-de-banda-lateral
https://stackoverflow.com/questions/38378914/how-to-fix-git-error-rpc-failed-curl-56-gnutls
https://gitlab.com/gitlab-org/cookbook-gitlab/-/issues/33
git rebase
git trace
1 | set GIT_TRACE=1 |
git报错
由于梯子断了造成问题。
1 | git push |
git submodule
使用submodule来管理第三方的库。🐞:fish:
加速访问方式
推荐一个github下载加速器:https://ghproxy.com/
GitHub Proxy
GitHub 文件 , Releases , archive , gist , raw.githubusercontent.com 文件代理加速下载服务.
submodules
Understanding and Working with Submodules in Git
添加一个submodule
1 | git submodule add https://github.com/spencermountain/spacetime.git |
.gitmodules文件里面写会
在git clone的时候,指定自己的key,用多个账号
1 | git clone git@github.com:xxxx/xxxx.git --config core.sshCommand="ssh -i ~/.ssh/xxx-user-02/xxx-user-id_rsa" |
https://stackoverflow.com/questions/7927750/specify-an-ssh-key-for-git-push-for-a-given-domain
下面是实践:
1 | # * 这里一定要指定自己的输出目录,否则会出现没有权限的问题。 |
github 加速网站
Permission denied (publickey)
ghcr
这个是github里面提供的一个私有的镜像服务。可以通过编写 .github/workflows里面的yaml文件,支持当我们推送的时候将一个版本打出来。
提交约定
切换 git 绝对路径
https://blog.csdn.net/Crazy_Tengt/article/details/113561819
配置git的绝对路径
1 | "git.path": "/opt/rh/rh-git218/root/usr/bin/git" |
git推送新版本
1 | src refspec master does not match any |
git-pull-rebase
1 | hint: You have divergent branches and need to specify how to reconcile them. |
修改历史上的作者信息
1 | git filter-branch --env-filter ' |
git large file storage
1 | brew install git-lfs |
git remote main
发现在 gitLab 里面的远程没有 ref/HEAD 造成了一些麻烦,通过这个指令就能指定。
1 | git remote set-head origin main |
不过最后还是找到了网站里面,可以通过web页面来设定远程的主干分支。
git push报错
https://blog.csdn.net/qq_41035283/article/details/124058657
server certificate verification failed
git config –global http.sslverify false
删除掉git的缓存
如果这些目录或文件已经被追踪,你需要从 Git 历史记录中删除它们,并更新工作目录:
清理追踪的文件
git rm -r –cached _build
git rm -r –cached apps
git rm -r –cached deps
git rm -r –cached logs
如何将git中的内容导出来
1 | git archive --format=zip --output=/path/to/destination/archive.zip master |
概述
1 | { |
在 Gogs 中,可以通过修改配置文件来设置上传文件的大小限制。具体步骤如下:
步骤 1: 找到 Gogs 的配置文件
Gogs 的配置文件通常位于安装目录的 custom/conf/app.ini 路径下。如果你没有找到 custom/conf/app.ini,也可以查看 conf/app.ini 文件。
步骤 2: 修改配置文件
打开 app.ini 文件,找到与文件上传相关的配置。Gogs 使用 HTTP 模块来管理文件上传,相关的配置项是 MAX_UPLOAD_SIZE,它控制上传文件的大小限制。
[attachment]
MAX_SIZE = 32
•	MAX_SIZE 的单位是 MB,默认值可能是 32(即 32MB)。
•	将 MAX_SIZE 改为你想允许的最大文件大小,比如 100MB:
[attachment]
MAX_SIZE = 100
步骤 3: 重启 Gogs 服务
修改配置文件后,需要重启 Gogs 服务使配置生效。你可以通过以下命令重启 Gogs(假设你是通过 systemd 管理 Gogs 服务):
sudo systemctl restart gogs
或者,如果你是以手动方式启动的 Gogs,可以停止并重新启动 Gogs:
停止 Gogs
pkill gogs
启动 Gogs
/path/to/gogs web
步骤 4: 验证修改
重启 Gogs 之后,你可以尝试上传文件,确保新的文件大小限制生效。
这样设置之后,你就可以通过 Gogs 上传更大(或更小)的文件了。
如果你想临时回滚到某个特定的 commit(hash),有几种方法可以选择,取决于你的需求:
- 仅临时回滚(不修改历史记录)
如果你只是想暂时回到某个 commit,但不修改 Git 历史,可以使用 git checkout 或 git switch:
git checkout
或者
git switch –detach
效果:
	•	这样你会进入 detached HEAD 状态,可以查看这个 commit 的代码,但不会影响你的分支。
•	这不会修改历史记录,也不会影响当前分支。
•	如果需要回到原来的分支,可以使用 git checkout <branch-name> 或 git switch <branch-name>。
- 临时回滚并允许修改(软回滚)
如果你想回滚到某个 commit 但保留修改的代码(比如回滚后再做一些新修改),可以用 git reset –soft:
git reset –soft
效果:
	•	HEAD 移动到 <commit-hash>,但你的文件和 staged 变更都不会丢失。
•	适用于想修改代码但不影响 commit 记录的情况。
- 回滚并清除修改(硬回滚)
如果你想回滚到某个 commit,并且完全丢弃当前的修改(包括未提交的和已提交的):
git reset –hard
⚠️ 注意:
	•	所有未提交的更改都会丢失!
•	无法恢复,除非之前有 git stash 或 git reflog。
•	适用于彻底回滚到某个 commit,不留任何当前更改。
- 回滚到某个 commit 并创建新分支
如果你想回滚到某个 commit,并基于它创建一个新分支(不影响原分支):
git checkout -b
或者
git switch -c
效果:
	•	你的代码会回到 <commit-hash>,但不会影响原来的分支。
•	适用于想在历史 commit 上重新开发,但不影响当前分支的情况。
总结
命令 作用 是否影响历史
git checkout
git reset –soft
git reset –hard
git checkout -b
如果只是临时回滚查看代码,推荐 git checkout
git checkout -b m 388a25291f9a182a23c0558293028cf6987991bc
不能推送大的项目问题
- 我搭建了一个gogs的仓库;使用了cloudflare和nginx来做的域名;
- 当客户端同事推送git仓库的时候,无法推送成功将会卡住,并且出现下面的报错;
Writing objects: 100% (10141/10141), 131.04 MiB | 500.69 MiB/s, done.
Total 10141 (delta 2793), reused 10136 (delta 2791), pack-reused 0
error: RPC failed; HTTP 413 curl 22 The requested URL returned error: 413
send-pack: unexpected disconnect while reading sideband packet
fatal: the remote end hung up unexpectedly
Everything up-to-date - 我让客户端同事将项目打包,我直接放到gogs服务器机器本地,使用http://127.0.0.1推送,是能迅速提送成功;
- 当前gogs的app.ini配置里面我添加下面配置,已经重启;
[server]
MAX_REQUEST_BODY_SIZE = 0 - 在nginx里面我添加了下面的配置,已经重启;
server {
client_max_body_size 800m;
client_body_buffer_size 128k;
fastcgi_intercept_errors on;
} - 现在问题是为啥会出现无法通过域名,远程推送,而老是会爆出 hung up的问题;
1 | # 查看 Gogs 当前生效配置 |
你的问题很可能是 Nginx 仍然限制了 HTTP 请求体的大小,即使你已经设置了 client_max_body_size 800m,也可能还有其他地方影响,比如:
可能的原因与解决方案
- 确保 Nginx 的 client_max_body_size 设置生效
在 正确的 server 或 location 配置块中 添加:
server {
listen 80;
server_name your.domain.com;
client_max_body_size 800m;
client_body_buffer_size 128k;

location / {
    proxy_pass http://127.0.0.1:3000;
    proxy_set_header X-Real-IP $remote_addr;
    proxy_set_header X-Forwarded-For $proxy_add_x_forwarded_for;
    proxy_set_header Host $host;
    proxy_buffering off;
}
}
然后 重启 Nginx 并查看是否生效:
nginx -t # 检查配置是否正确
systemctl restart nginx # 重启 Nginx
如果是 Docker 运行的 Nginx,可能还需要 docker restart nginx。
- 确保 Gogs 的 MAX_REQUEST_BODY_SIZE 设置生效
你已经在 app.ini 中添加了:
[server]
MAX_REQUEST_BODY_SIZE = 0
但 Gogs 可能 仍然默认使用 32MB 的限制,你可以 尝试明确设置为更大的值:
[server]
MAX_REQUEST_BODY_SIZE = 800
然后重启 Gogs:
systemctl restart gogs # 如果是 systemd 方式
supervisorctl restart gogs # 如果用的是 Supervisor
- Cloudflare 可能拦截大文件上传
Cloudflare 免费版的 最大文件上传限制是 100MB,如果你的 Git push 超过了这个大小,Cloudflare 可能会返回 413 Request Entity Too Large。
解决方案
• 方法 1:直接绕过 Cloudflare,使用 “直接 IP + Nginx” 的方式推送:
git remote set-url origin http://your-server-ip:3000/your-repo.git
git push origin main
如果这样可以推送,说明 Cloudflare 限制了文件大小。
•	方法 2:如果你使用 Cloudflare Pro 版或更高级别,可以进入 Cloudflare Dashboard:
1.	选择你的域名。
2.	进入 Network 设置,找到 Maximum Upload Size 并调大。
3.	在 Caching 选项中关闭 Cache Everything,让大文件不被缓存。
•	方法 3:使用 Cloudflare “grey-cloud” 直连模式(绕过 CDN):
1.	进入 Cloudflare Dashboard。
2.	找到你的 Gogs 绑定的域名。
3.	把 Proxy Status 从 Proxied (Orange Cloud) 改为 DNS Only (Grey Cloud)。
- 增加 Nginx 超时配置
如果 网络环境不稳定 或者 Gogs 处理数据较慢,可能导致 超时 断开连接。可以增加 Nginx 的超时时间:
server {
client_max_body_size 800m;
client_body_buffer_size 512k;
location / {
    proxy_pass http://127.0.0.1:3000;
    proxy_set_header Host $host;
    proxy_set_header X-Real-IP $remote_addr;
    proxy_set_header X-Forwarded-For $proxy_add_x_forwarded_for;

    # 防止长时间推送导致超时
    proxy_connect_timeout 600;
    proxy_send_timeout 600;
    proxy_read_timeout 600;
    send_timeout 600;
}
}
然后重启 Nginx:
systemctl restart nginx
⸻
总结
你的问题很可能是 Cloudflare 限制 或 Nginx 配置未生效:
1. 先 尝试用 IP 直连 (http://your-server-ip:3000/your-repo.git),看看能否推送成功。
2. 如果 IP 直连成功,而域名不行,说明 Cloudflare 限制,可以:
• 关掉 Cloudflare Proxy(改成 DNS Only)。
• 或者 升级 Cloudflare 计划 来增加上传限制。
3. 确保 Nginx 的 client_max_body_size 和超时配置生效:
nginx -t && systemctl restart nginx
4. 确保 Gogs MAX_REQUEST_BODY_SIZE 不是 0,而是 800MB 以上。
试试这些方案,看看哪一步解决了问题!🚀
sudo nginx -T | grep -C 10 “client_max_body_size”
在客户端执行:
1 | # 清除旧配置 |
1 | server { |
app.ini
1 | [repository] |
sudo systemctl restart nginx gogs
在 Gogs 中,你可以通过修改 app.ini 配置文件来调整 日志级别 和 日志文件大小管理。
⸻
- 调整 Gogs 日志级别
Gogs 的日志级别可以在 app.ini 文件的 [log] 配置部分进行修改:
步骤
1. 打开 app.ini 配置文件(默认路径:/path/to/gogs/custom/conf/app.ini)
nano /path/to/gogs/custom/conf/app.ini
2. 修改日志级别
在 [log] 部分,设置 更详细的日志级别:
[log]
MODE = file
LEVEL = debug
ROOT_PATH = /var/log/gogs
•	MODE:
•	console  —— 直接输出到终端
•	file  —— 记录到日志文件
•	console, file  —— 同时输出到终端和日志文件
•	LEVEL:
•	trace  —— 最高级别,输出所有日志(最详细)
•	debug  —— 调试信息
•	info  —— 重要的正常日志(默认)
•	warn  —— 仅警告
•	error  —— 仅错误信息
•	critical  —— 仅严重错误

3.	重启 Gogs 使配置生效:
systemctl restart gogs # 如果使用 systemd
supervisorctl restart gogs # 如果使用 Supervisor
⸻
- 控制日志文件大小
为了避免日志文件过大,可以使用 logrotate 来管理 Gogs 的日志。
方法 1:Gogs 内置日志切割
从 Gogs 0.12.0 版本开始,支持 DAILY_ROTATE 配置:
[log]
MODE = file
LEVEL = info
ROOT_PATH = /var/log/gogs
DAILY_ROTATE = true # 每天生成一个新的日志文件
MAX_DAYS = 7 # 只保留最近 7 天的日志
这会让 Gogs 每天 生成一个新日志,并自动删除超过 7 天的旧日志。
⸻
方法 2:使用 logrotate 自动管理日志
如果你使用的是 较老版本的 Gogs,或者希望更灵活地管理日志,可以用 logrotate 进行日志切割。
步骤
1. 创建 Logrotate 配置文件
sudo nano /etc/logrotate.d/gogs
2. 添加如下配置
/var/log/gogs/*.log {
daily
rotate 7
compress
missingok
notifempty
copytruncate
}
•	daily  —— 每天轮转日志
•	rotate 7  —— 只保留最近 7 份日志
•	compress  —— 使用 gzip 压缩老的日志
•	missingok  —— 如果日志文件不存在,则跳过,不报错
•	notifempty  —— 如果日志为空,则不进行轮转
•	copytruncate  —— 先复制日志再清空原始文件(适用于 Gogs 正在写入的日志)

3.	测试 logrotate
sudo logrotate -d /etc/logrotate.d/gogs
如果没有错误,就可以手动执行:
sudo logrotate -f /etc/logrotate.d/gogs
⸻
- 观察日志
可以使用以下命令查看日志:
tail -f /var/log/gogs/gogs.log
如果启用了 debug 级别,可以看到更详细的日志。
⸻
总结
✅ 调整日志级别
• LEVEL = debug(调试) 或 LEVEL = trace(最详细)
• 重启 Gogs 使生效
✅ 限制日志大小
• 方法 1:Gogs 自带 DAILY_ROTATE = true(推荐)
• 方法 2:logrotate(适用于所有版本)
这样可以 获得详细日志,同时 避免日志过大 🚀
https://github.com/gogs/gogs/blob/v0.13.0/conf/app.ini
- 设置环境变量 GOPRIVATE
告诉 Go 哪些路径是“私有的”,不要走 proxy/sum:
export GOPRIVATE=gitspace.myco.io
参考
- [1] Git菜鸟教程
- [2] 廖雪峰-Git教程
- [3] 官网手册
- [4] clobber-existing-tag
- [5] git pull 和 git fetch的区别?
- [6] Git-stash常用