项目里面需要将行为树project批量的导出子树。
源代码
开始部署环境 安装环境 将node.js 设置成 10.x win32版本,再去匹配 gulp 的版本。
通过命令行安装gulp工具。
1
2
3
4
npm install gulp-cli -g npm install gulp -D npx -p touch nodetouch gulpfile.js gulp --help
设置梯子 1 2 3 4 5 6 7 8 9 10 11 12 13 14 15 npm config set registry http://registry.npm.taobao.org 其实就是 .npmrc registry=http://registry.npm.taobao.org npm cache clear --force // 配置梯子,否则就会无法安装; Add the below entry to your .bowerrc: { "proxy":"http://<user>:<password>@<host>:<port>", "https-proxy":"http://<user>:<password>@<host>:<port>" }
遇到的问题 1 2 3 4 5 6 7 8 9 10 11 12 13 14 15 bower sweetalert#~1 .0 .0 -beta cached https://github.com/t4t5/sweetalert.git#1 .0 .1 bower sweetalert#~1 .0 .0 -beta validate 1 .0 .1 against https://github.com/t4t5/sweetalert.git#~1 .0 .0 -beta bower fontawesome#~4 .3 .0 ECMDERR Failed to execute "git ls-remote --tags --heads https://github.com/FortAwesome/Font-Awesome.git", exit code of #128 fatal: unable to access 'https://github.com/FortAwesome/Font-Awesome.git/': Failed to connect to github.com port 443 : Timed out Additional error details: fatal: unable to access 'https ://github.com /FortAwesome /Font -Awesome.git /': Failed to connect to github.com port 443: Timed out // 配置梯子,否则就会无法安装; Add the below entry to your .bowerrc :{ "proxy ":"http ://<user >:<password >@<host >:<port >", "https -proxy ":"http ://<user >:<password >@<host >:<port >" }
当下载实在不行的时候,可以直接通过github里面下载源码,然后直接放到目录中。
目录说明
1 2 3 4 5 6 7 8 9 10 11 12 bower_components // bower 支持库目录 | ----angular-tree -control | ----... .temp-dist // 打包输出exe的目录 | | ----behavior3editor-win32-ia32 // win32版本的exe | ----... node_modules // node.js 支持库目录
node,gulp版本不合 1 2 3 4 5 6 7 8 9 10 11 12 13 14 15 16 17 18 PS D:\work\trunk\behavior3editor_bf> gulp serveReferenceError: primordials is not defined at fs.js:45 :5 at req_ (D:\work\trunk\behavior3editor_bf\node_modules\natives\index.js:143 :24 ) at Object.req [as require ] (D:\work\trunk\behavior3editor_bf\node_modules\natives\index.js:55 :10 ) at Object.<anonymous> (D:\work\trunk\behavior3editor_bf\node_modules\graceful-fs \fs.js:1 :37 ) at Module._compile (internal/modules/cjs/loader.js:1063 :30 ) at Object.Module._extensions..js (internal/modules/cjs/loader.js:1092 :10 ) at Module.load (internal/modules/cjs/loader.js:928 :32 ) at Function.Module._load (internal/modules/cjs/loader.js:769 :14 ) at Module.require (internal/modules/cjs/loader.js:952 :19 ) at require (internal/modules/cjs/helpers.js:88 :18 ) > node --version v14.16.0 > gulp -v CLI version: 2.3 .0 Local version: 3.9 .1
解决方案:
1 2 3 4 5 6 7 8 9 10 11 12 13 14 15 16 17 18 19 20 21 22 23 24 25 ##安装npm版本控制器 npm install -g n ##切换npm版本到 V10 (v10 版本的npm会安装 node 10 ) sudo n v10.19 .0 ##安装node npm i -g node ##查看node版本 node --version ##现在node版本切换到了v10了,可以重新安装依赖的 #重新安装gulp(版本很重要,应该是代码发布时的版本,而不是本地的版本) npm i -g gulp@3 .9 .1 --force #重新安装依赖 npm install npm install -g nvm ##运行 gulp watch ———————————————— 版权声明:本文为CSDN博主「内心毫无波动甚至还想笑」的原创文章,遵循CC 4 .0 BY-SA版权协议,转载请附上原文出处链接及本声明。 原文链接:https://blog.csdn.net /yym836659673/article/details/104847572 /
将node.js降低到 10.x版本,再去匹配 gulp 的版本。
node.js_10.x版本下载
在做dist的时候,还是会下载electronc 1 2 Downloading electron-v0 .34.2 -linux-ia32 .zip [> ] 0.0 % (0 B/s)
还需要安装:
electron_v0.30.4下载地址
国内下载地址:
国内源
使用electron v0.34.2的时候,需要使用Node 8.x版本的node.js。最后发布时间:17-Dec-2019 07:08
下载页面
1 The Node version in "E:/electron-v0.34 .2 -win32-ia32/electron.exe" is outdated (version ), we require at least Node 8 .x. Would you like to try debugging anyway?
electron里面调整界面都是通过html来制作的。
variables.less文件里面@size-sidebar: 500px;修改了之后,可以让弹出框更加大。
1 2 3 4 5 var stat = fs.statSync(subPath); if (!stat.isDirectory()) { fs.mkdirSync(subPath, { recursive: true } ); }
文件占用 打开资源管理器。
其实就是vscode的powershell占用了文件。重启一次vscode就好了。
修改gulpfile.js 在这个文件里面,定义输出的版本是 windows arch类型: i32 就好了。
1 2 3 4 5 6 7 8 9 10 11 gulp.task ('_electron' , ['build' ], function (cb ) { packager ({ dir : 'build' , out : '.temp-dist' , name : project.name , platform : 'win32' , arch : 'ia32' , version : '0.34.2' , overwrite : true , asar : true }
由于网络情况,如果想把全部平台的库都下载全了,也是比较困难的。
批量导出子树源码 改造的位置:
export.controller.js: 75 lines
1 2 3 4 5 6 7 8 9 10 11 12 13 14 15 16 17 18 19 20 21 22 function save ( }else if (vm.type === 'trees' ) { dialogService .openDirectory () .then (function (path ){ tree = project.trees .each (function (tree ) { var root = tree.blocks .getRoot (); defaultName = root.title ; var fs = require ('fs' ); var e = $window.editor .export ; _createJson (e.treeToData (tree)) console .log (vm.pretty ) fs.writeFileSync (path +'/' +defaultName +'.json' , vm.pretty ) notificationService.success ( 'File path' , defaultName +'.json' ); }); }); }
其实就是将project.trees遍历;
将tree内容萃取出json;
直接使用fs模块,同步写入文件;
dialogService.openDirectory()能让用户自己指定输出目录;
notificationService.success()将日志输出到屏幕上;
我现在还不会如何调试,阅读了一点eletronc的文档,东西不少,今后有时间再来学习。
调试功能还是支持的
gulp serve
在node.js中又很多丰富的库,所以使用这个来编写程序时候,多想想有没有三方库。这点类似python。
增加目录的支持 在半年前,behavior3editor 作者在对这个编辑器做了一些提升,添加了path的概念。
src\app\pages\editor\components\menubar.html
文件里面可以修改界面。
1 <li > <a ng-click ="menubar.onExportTreesJson()" > Batch export trees as JSON</a > </li >
用了调试器,将会加快编写工作。
1 Cannot read property 'length' of undefined
在这套代码里面的目录规划
处在根目录的文件:
1 2 3 4 5 6 7 8 9 10 11 12 13 14 15 16 17 18 19 20 { "version" : "0.3.0" , "scope" : "tree" , "id" : "62d315fa-c8bf-4fa2-9205-89cd6a1c5062" , "title" : "BasicMonster" , "description" : "" , "root" : "6bb72df3-2b86-4cf4-8d43-d0c2c52e49c4" , "properties" : { } , "parent" : null , "custom_folders" : [ { "version" : "0.3.0" , "scope" : "folder" , "name" : "f8f5b0bd-285e-400b-85f4-8ab673ea4fe8" , "category" : "tree" , "title" : "ai" , "description" : "ai子目录;" , "parent" : null }
tree 能被 folders 包含,folders也能设置parent。
当导出的时候,我们就能使用这个custom_folders来创建本地目录。
通过fs来迭代创建目录。
1 fs.mkdir (subPath, { recursive : true }, function (err ) {});
读取tree的folders信息:
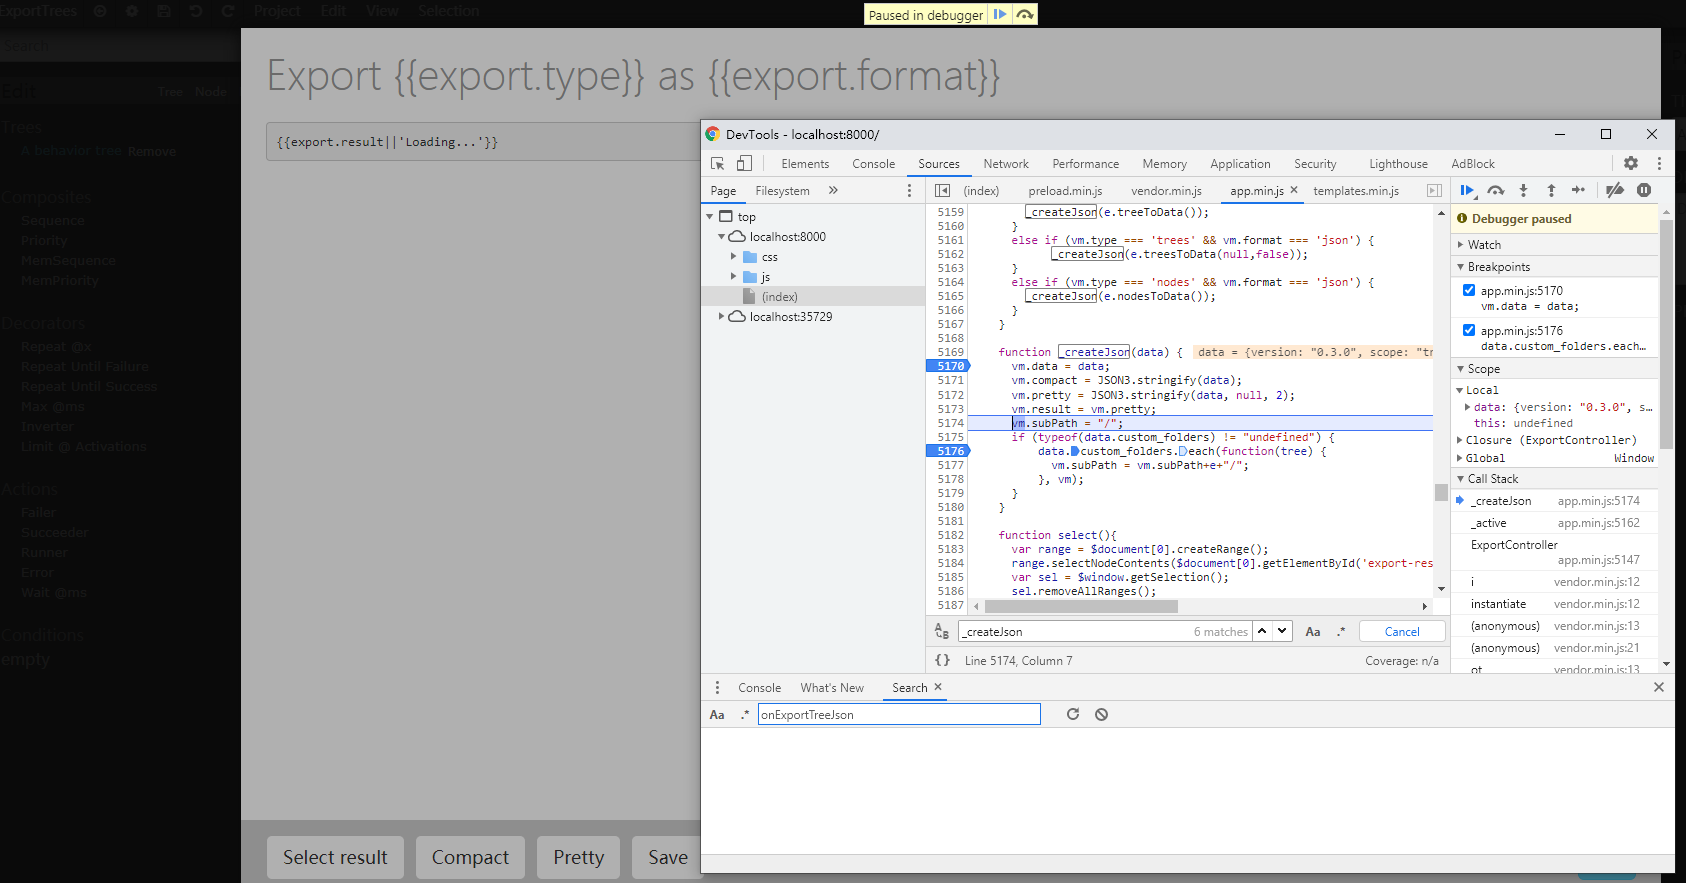
1 2 3 4 5 6 7 8 9 10 11 12 13 14 15 16 17 18 19 20 21 22 23 24 25 26 27 28 29 30 31 32 33 34 function _fetchSubPath (parent,custom_folders ) { var retStr = "" ; var node; for (var i = 0 ; i < custom_folders.length ; i++) { if (custom_folders[i].name == parent) { node = custom_folders[i]; break ; } } if (node.parent == undefined ) { retStr = "/" + node.title ; } else { retStr = _fetchSubPath (node.parent ,custom_folders) + "/" + node.title ; } return retStr; } function _createJson (data ) { vm.data = data; vm.compact = JSON 3.stringify (data); vm.pretty = JSON 3.stringify (data, null , 2 ); vm.result = vm.pretty ; vm.subPath = "/" ; if (data.parent == undefined ) { return ; } if (data.custom_folders == undefined ) { return ; } vm.subPath = _fetchSubPath (data.parent ,data.custom_folders ) + "/" ; }
导出部分代码, export.controller.js function save()
1 2 3 4 5 6 7 8 9 10 11 12 13 14 15 16 17 18 19 20 21 22 23 if (vm.type === 'trees' ) { dialogService .openDirectory () .then (function (path ){ tree = project.trees .each (function (tree ) { var root = tree.blocks .getRoot (); defaultName = root.title ; var fs = require ('fs' ); var e = $window.editor .export ; _createJson (e.treeToData (tree)); var subPath = path +vm.subPath ; fs.mkdir (subPath, { recursive : true }, function (err ) {}); _createJson (e.treeToData (tree,true )); fs.writeFileSync (subPath+defaultName +'.json' , vm.pretty ); notificationService.success ( 'File saved' , defaultName +'.json' ); }); }); }
https://blog.csdn.net/aerchi/article/details/106348750
1 A JavaScript error occured in the main process
无法启动electron的desktop版本。
在代码里面有一份尝试创建目录的代码:
1 2 3 4 5 6 7 function _createIfNonExist (path ) { try { var s = nodejsService.fs .statSync (path); } catch (e) { nodejsService.fs .mkdirSync (path); } }
弹出框是通过 notification.service.js function _note(config)
里面的html可以定义这套显示的东西。
1 2 3 4 5 6 7 var DEFAULT = { type : 'default' , title : '' , message : '' , icon : false , delay : 10000 , };
1 2 <div class ="notification-message" style =" width:590px; // 调整显示区域;
界面还是通过 class 来做渲染,使用了 less 决定了界面样式。
最后使用的文件为 c_notification.less 文件。
1 2 3 4 5 6 7 8 width : @size-sidebar +@icon-size ;@add-ntf-size : 1000px ;width : @size-sidebar +@icon-size +-@add-ntf-size ;right : -@size-sidebar +-@icon-size +-@add-ntf-size ;
最近将node.js版本降级到 v8.17.0 结果不能支持迭代创建目录了。尝试将版本升级到 v10.x 再来尝试,果然好了。
1 2 3 4 5 6 7 8 var fs = require ('fs' );var subPath='E:/work_client/server/res/ai/base/SubTree/' ;fs.mkdir (subPath, { recursive : true }, function (err ) { console .log (err) });
参考